Multi-Level Approval Locking
Based on how you run your process through your organization, approval locking can be used to control user access based on approval status if desired.
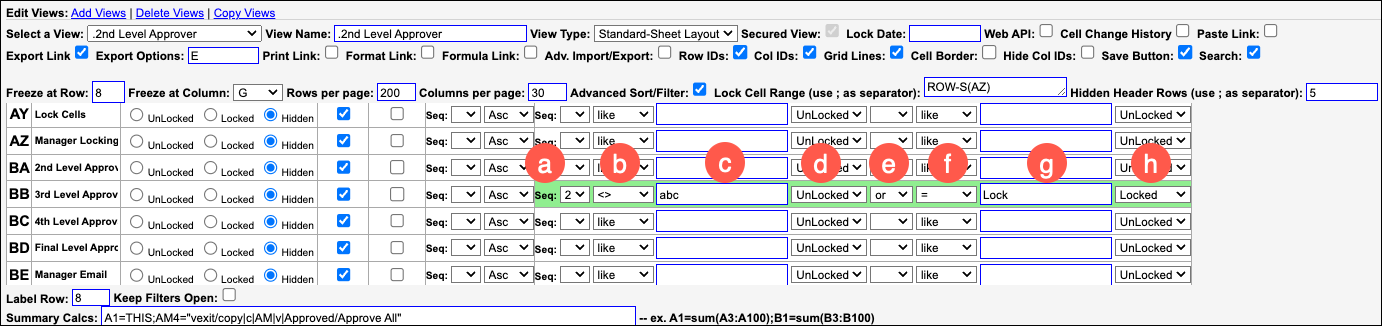
For an example spreadsheet with approval locking setup,click here.
Scenarios may include:
- Each level submits/approves their recommendations before opening to the next level
- All levels remain open until the level above submits/approves their recommendations
SCENARIO: Each Level Submits/Approves Before Opening to the Next Level
In this scenario, each level of planners/management must submit/approve before it opens to the next. Here's an example with Direct Manager, Level 2 Approver and Level 3 Approver:
- The submit/approval process needs be completed in this order: Direct Manager, Level 2 Approver and Level 3 Approver:
- Direct Manager submits
- The data entry fields lock to the Direct Manager and open to Level 2 Approver
- Level 2 Approver approves
- The data entry fields lock to the Level 2 Approver and open to Level 3 Approver
- Level 3 Approver approves
- The data entry fields lock to the Level 3 Approver
SCENARIO: All Levels Open Until the Level Above Submits/Approves:
In this scenario, all levels of planners/management can enter data until the level above submits/approves. Here's an example with Direct Manager, Level 2 Approver and Level 3 Approver:
- The SecureSheet is active and all users have access to enter data
- Level 2 Approver approves
- The data entry fields lock to the Direct Manager
- Level 3 Approver approves
- The data entry fields lock to the Direct Manager and Level 2 Approver
Setting up the submit/approval locking:
- The Excel model will need designated submit/approval columns for each level and separate locking columns.
- The locking columns will use IF statements based on the status listed in the submit/approval columns.
- In View design in SecureSheet, modify the advanced filter on the approval locking columns you've created:
- Assign a Seq: to the advanced filter (the number will vary on how many seq you already have set up)
- Select the condition not equal to (<>) to be used for the comparison
- List abc as the comparison text
- Set to unlocked
- Use or as the connector
- Select the 2nd condition as In
- List the 2nd comparison text as LOCK or whichever word you choose to use within your Excel IF statement for when the row should lock
- Set to Locked