Set Maximum Rows and Columns for a View
Rows and columns can be increased to 10,000 cells as the maximum number of combined rows and columns allowed in any given view. Most often, users want to be able to scroll horizontally through all the columns they can see on one page.
These steps show how to find the maximum number of rows per page based on the visible columns (both locked and unlocked) in a specific view.
- The goal is for the user to be able to scroll horizontally through all the visible columns in the view on one page without having to navigate to additional columns using Columns Next >> and << Prev Columns.
- The set-up in the example uses an .HRBP view.
Setting Maximum Rows and Columns for a View
- Click Views to enter View design mode.
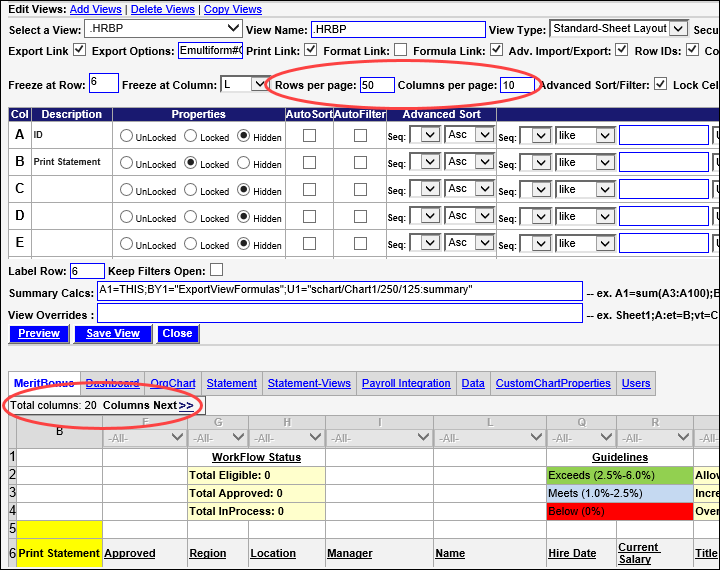
- Select a View from the Select a View drop-down list. In the example, we are in the design mode for the .HRBP view.
NOTE: Rows per page is 50 and columns is 10, and there are 20 total columns set to be visible (Locked or UnLocked) in this view, which you can see below the tabs in the SecureSheet.
NOTE: To find the Total Columns that are visible (Locked or UnLocked) in this view, set Columns per page to 1, Click Save View and you will see the Total Columns under the tab(s).
- Divide the total possible cells (10,000) by the total columns (20) to find the maximum rows per page setting (500).
- Update Rows per page to 500 and Columns per page to 20.
- Click Save View.
NOTE: Setting the Columns per page to 20 also means that users will be able to scroll horizontally to see all the columns in the view (and not have to use the arrow navigation to get to the next set of columns).
- Repeat Steps 2 - 5 in any view to set the maximum number of rows based on the visible columns.
NOTE: If it is not priority to have users scroll horizontally through all visible columns on one page, increase the number of rows and then users will page through the columns.