Manage Users and Sharing
Anytime you are adding a new user to SecureSheet, they must be in the Users tab in your Users-Views SecureSheet, and also shared to their applicable views in your main SecureSheet. These are the main tasks to manage users:
- Maintaining Users in the Users-Views SecureSheet
- Sharing a SecureSheet to Users
Video Resources:
- Add users to sharing for the first time
- Update sharing for an individual
- Adding new user(s) using the Copy/Add All Sheets tool
Maintaining the Users Tab in the Users-Views SecureSheet
You fill out the Users tab with some required fields that SecureSheet uses for security set-up for each user:
- EEID
- Email Address
- First Name
- Last Name
For accurate tracking and ease in managing sharing, also maintain the views a user has permission to on the Users tab (Setting Up Users-Views).
Only remove a user from the Users tab if they are no longer part of the planning cycle or have left the organization.
Adding a New User to the Users Tab
When adding a new user to SecureSheet, they have to be on the Users tab in your Users-Views SecureSheet.
- Click the Users-Views SecureSheet.
NOTE: The Users-Views SecureSheet will likely be in the Hidden SecureSheets area of your SecureSheet site.
- Go to the Users tab.
- Select the .Add Users view from the View drop-down.
- Fill in the user’s information (if you are adding more than one new user, you may enter multiple rows at the same time).
- Click Save Changes.
- Continue with the instructions for Adding User(s) to Sharing for the First Time to share your new user to the SecureSheet they need to access.
Sharing a SecureSheet
- You must have administrator permission to manage users and user sharing in SecureSheet.
- When you initially add users to a SecureSheet or change sharing settings for a group or groups of users, it is helpful to have them grouped on your Users tab (from your Users-Views SecureSheet) to copy/paste them into the Sharing box.
- Follow the steps below to prepare your Users tab for sharing or skip to:
Preparing for Sharing - Export and Sort Your Users File
Group your users on your Users tab by following these steps:
- Export your Users-Views SecureSheet and open in Excel.
- Sort the users by View. This groups users with common Sharing profiles.
- Optionally, highlight each common group with a different color. This may be visually helpful when copying emails to the Sharing box in the next steps, but it is not required.
NOTE: When working with Sharing for a group of users, their email addresses must be delimited by a semi-colon. The Emails for Sharing column is set to concatenate a semi-colon to the email address found in Column A. If you do not see this column in your export or it is not concatenating properly, add the Emails for Sharing column with this formula: =A2&”;” and then highlight common groups.

Adding User(s) to Sharing for the First Time
NOTE: When adding a new user(s) to SecureSheet, they have to be on the Users tab in your Users-Views SecureSheet, as well as be given access to secured views through Sharing in your main SecureSheet. Use the Add Users(s) view on the Users tab to add a new user.
To see a video on sharing users to to a SecureSheet for the first time, click here.
- Open the SecureSheet that you want to share.
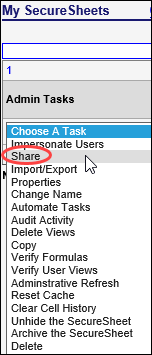
- Select Share from the Admin Tasks drop-down or click Share from within the SecureSheet.

- The Share page appears. Follow these steps to add users for the first time:

- Enter the email address(es) in the Sharing box at the top, separated by a semi-colon.
NOTE: Refer to your exported and formatted Users tab. Copy the email addresses for a group of users with a common Sharing profile from the Emails for Sharing column and paste them into the Sharing box. Remember, when working with a group of email addresses, they need to be delimited by a semi-colon (e.g., samsnead@acme.com; alicewonder@acme.com).
- The system defaults the Sharing Action to Add. Click the Add button below the box with the email address(es). The email address(es) will appear in the Sharing table.
- With the email address(es) still in the box, click Secured Views at the top.
- Select the Views from the drop-down list that you want the user(s) to be able to access.
- Click the Change Secured Views button below the box with the email address(es). The Secured Views will now be visible in the Sharing table.
- With the email addresses still in the box, click Default Views at the top.
- Select the View from the drop-down list that you want the user to see as their first view when they login to SecureSheet. If no View is selected, the view order will be alphabetical.
- Click the Change Default View button below the box with the email addresses. The Default View you selected will now be visible in the Sharing table.
Repeat steps 3A – 3D for each group of users with common Sharing profiles.
NOTE: User Permissions are usually set to Update or View Only. If you need to extend other capabilities to a group of users, contact help@securesheet.com.
Updating the Sharing Profile for a Group of Users
- Open the SecureSheet that you want to share.
- Select Share from the Admin Tasks drop-down or click Share from within the SecureSheet.

- The Share page appears. Follow these steps to update the Sharing profile for a group of users:

- Enter the email addresses in the Sharing box at the top, separated by a semi-colon.
NOTE: Refer to your exported and formatted Users tab. Copy the email addresses for a group of users with a common Sharing profile from the Emails for Sharing column and paste them into the Sharing box. Remember, they need to be delimited by a semi-colon.
- Click the respective Sharing Action button that you want to update for this group.
- Remove – Removes the users from this SecureSheet tab.
NOTE: User permissions are setup on each tab in a SecureSheet. If you have to remove a group of users, check to be sure they are removed from each tab they may have had permission to access.
- Permission – Defines what users can do on the sheet:
- Administrator - allows user to access all administrator and end user views in a SecureSheet. In order to impersonate an end user as an Administrator, a user must be shared to all of the tabs in a SecureSheet. Administrator access is controlled at the SecureSheet level. This means that you may have different administrator groups across functional areas/business untis acting as administrators only on the SecureSheet(s) relevant to their functional area/business unit.
- Update - allows user to update unlocked columns in the secured view(s) they have been given permission to access (most common permission granted).
- Update/Import View Values - allows user to import values into a view that has been setup for them to do so. Typically granted to users with a large organization or business partners who are updating massive amounts of data. For more information about this, click to import values by view.
- View Only - allows user to only view data in a secured view(s) they have permission to access in a SecureSheet. Even if columns are unlocked in a secured view, with View Only permission, a user cannot update unlocked columns in any view.
NOTE: User permissions are most often set to Update or View Only. If you have questions about permissions for your users, contact help@securesheet.com.
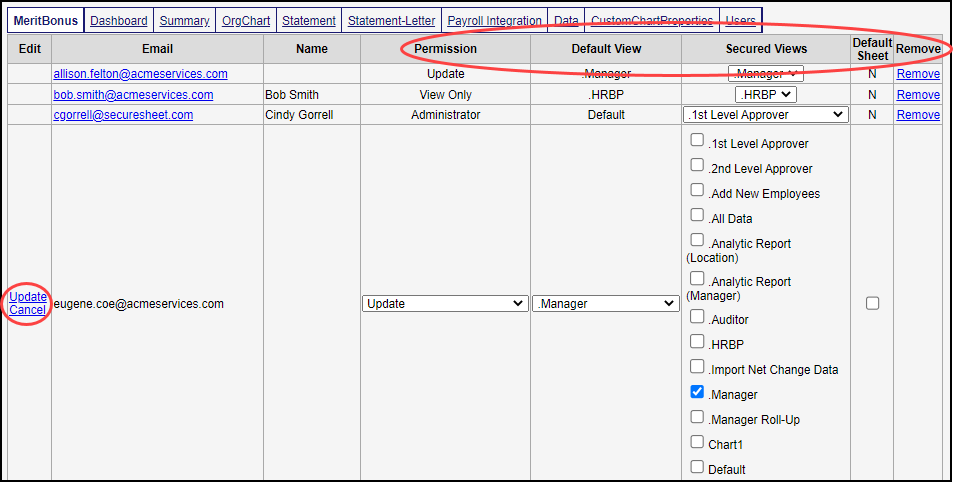
- Default View – The Secured View that defaults for the users when they access this tab in SecureSheet. This cannot be set until at least one Secured View has been saved for the user. If no tab is specified, they will default to the leftmost tab in the SecureSheet.
- Default Sheet – The tab that the user will default to after selecting the SecureSheet from their SecureSheet Home Page. If no tab is specified, they will default to the leftmost tab in the SecureSheet.
- Secured Views – Click the checkbox(es) next to the view names on or off to control the Views the user can access to see and/or input data.
- Click the respective sharing action blue button beneath the Sharing box to enable your change. You will see your Sharing change in the Sharing table.
Repeat steps 3A – 3C for each group of users with common Sharing profiles that you need to update.
Updating the Sharing Profile for an Individual User
To see a video of updating an individual sharing profile, click here.
- Open the SecureSheet that you want to share.
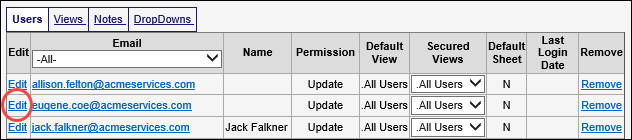
NOTE: You can also change individual email addresses by clicking the Edit link next to the email address of the user you want to change. This will unlock the row and allow you to make desired changes. Press the Update link on the row when done (or Cancel to discard changes).
- Select Share from the Admin Tasks drop-down or click Share from within the SecureSheet.
- The Share page appears. Follow these steps to update the Sharing profile for an individual user:
- Click the Edit link next to the user’s email address.
- Change the user’s sharing profile as needed:
- Permission – Defines what users can do on the sheet:
- Administrator - allows user to access all administrator and end user views in a SecureSheet. In order to impersonate an end user as an Administrator, a user must be shared to all of the tabs in a SecureSheet. Administrator access is controlled at the SecureSheet level. This means that you may have different administrator groups across functional areas/business untis acting as administrators only on the SecureSheet(s) relevant to their functional area/business unit.
- Update - allows user to update unlocked columns in the secured view(s) they have been given permission to access (most common permission granted).
- Update/Import View Values - allows user to import values into a view that has been setup for them to do so. Typically granted to users with a large organization or business partners who are updating massive amounts of data. For more information about this, click to import values by view.
- View Only - allows user to only view data in a secured view(s) they have permission to access in a SecureSheet. Even if columns are unlocked in a secured view, with View Only permission, a user cannot update unlocked columns in any view.
NOTE: User permissions are most often set to Update or View Only. If you have questions about permissions for your users, contact help@securesheet.com.
- Default View – The Secured View that defaults for the users when they access this tab in SecureSheet. This cannot be set until at least one Secured View has been saved for the user. If no tab is specified, they will default to the leftmost tab in the SecureSheet.
- Secured Views – Click the checkbox(es) next to the view names on or off to control the Views the user can access to see and/or input data.
NOTE: If you take off the view that was set as the Default View, you will have to click Update, select a new Default View, and click Update again.
- Default Sheet – If you select the checkbox, the user will default to this tab after selecting the SecureSheet from their SecureSheet Home Page. If no tab is specified, they will default to the leftmost tab in the SecureSheet.
- Remove – Removes the user from this SecureSheet tab.
NOTE: User permissions are setup on each tab in a SecureSheet. If you have to remove a user, check to be sure they are removed from each tab they may have had permission to access.
- Click the Update link next to the user’s email address to save your changes.
- If needed, make additional individual user sharing updates following Steps A – C.
Using the Copy/Add All Sheets Share Tool
On occasion, it is helpful to copy an existing user’s sharing profile to another user or group of users in need of the exact same profile. The Copy/Add All Sheets share tool makes this process simple. This can be useful after go-live when you have to add an additional user (s).
To see a video on adding new users using the copy/add all sheets tool, click here.
- Open the SecureSheet that you want to share.
- Select Share from the Admin Tasks drop-down or click Share from within the SecureSheet.

- The Share page appears. Follow these steps to copy an existing user’s profile to an individual or group of users in need of the exact same sharing profile:

- Enter the email address(es) in the Sharing box at the top, separated by a semi-colon if more than one.
- Click the Copy/Add (All Sheets) Sharing Action button.
- Select the email address whose Sharing profile you want to copy to the email address(es) listed in the Sharing box.
- Click the Copy/Add (All Sheets) blue button beneath the Sharing box to enable your change. You will see your Sharing change in the Sharing table.
- Click <<Go Back when you are finished updating Sharing.