Set Up a View to Import Values or Paste Values Into
When you are managing data in a live SecureSheet and you need to add or update values in a column or a range of columns, you may set up a view to export and import into, or copy values from Excel and paste directly into SecureSheet in this view.
You set up a data maintenance view in your SecureSheet that is a subset of the columns in your entire SecureSheet. A data maintenance view contains columns that help you filter the data set to a specific group of rows that you need to update (e.g., for adding Performance Ratings by Region or Department), or it may be an update to all rows in your sheet (e.g., for adding Performance Ratings, or Market Data for your entire data set).
NOTE: You cannot use the Import Values by View tool to import formula-driven columns. Formula updates require using the export/import values/formulas/formats tools.
Once the view is set up, you may:
- Use the Export View feature and then the Import Values (by View) tool to import into the specific columns that you need to update. The Import Values (by View) tool can be accessed in the Import/Export Tools for administrators.
- Use this maintenance view directly to copy values from Excel and paste values into the cells.
- If this view will be used by end users, adjust end user permission in the Sharing tools to Update/Import View Values for end users who need to have the Import Values (by View) capability.
Set Up a View to Import Values Into
- Add a new view. Name it clearly so that you know what it will be used for, e.g., Import Col-Q - Perf Rating.
- Accept the default settings for the view and edit the other view properties accordingly:
- Turn on the Web API: checkbox. This enables this view as an option in the Import Values (by View) tool.
- Turn on the Cell Border: checkbox.
- Set Freeze at Row: to the row with your column labels.
- Set Rows per page: to as large a number as allowed (up to 6000 cells can be displayed on a page).
- Set Columns per page: to include all the columns you have set to Locked or UnLocked in the view.
- Turn on the Advanced Sort/Filter: checkbox.
- List any header rows before your column label row in the Hidden Header Rows: box.
- Set your Label Row to the same as your Freeze at Row: setting.
- Set the Summary Calcs: box to A1=THIS;Z1="ExportViewValues".
NOTE: "Z1" is variable. Use a header cell that is not visible in the view and before the last three audit columns in SecureSheet. If you put this syntax in a cell that is visible in the view, "ExportViewValues" will appear in that header column (because Summary Calcs override cell settings in the view).
- If your exported file refers to a data validation list on another tab, use this syntax instead: A1=THIS;Z1="ExportViewFormulas: Data" where "Data" is the name of the tab with your data validation values.
- Click Add View.
- You can see the Column Descriptions after the view is saved.
- If you selected too many rows/columns per page, you will see an alert and will have to adjust to get to the 6000 cell maximum per page.
- Click Edit Views
- Select your newly created view from the Select a View dropdown.
- Turn on the Export Link checkbox.
- Set Export Options: to E.
- Turn on the Adv. Import/Export: checkbox.
- Set any columns to Locked that will help you filter your data set if you need (or may need) to update a subset of your rows, and, turn on the Auto Filter for the columns that will help you filter the data set.
- Set any columns to UnLocked that you want to import or paste values into.
NOTE: Always set Column A - Unique ID to Locked.
- Set all other columns to Hidden.
- Click Save View.
- Follow the steps to export the view.
- After making updates in Excel, you can Import Values (by View) or Copy and Paste Values into a Column or Range of Columns.
Notes about exporting then importing values by view:
- SecureSheet validates that the columns, column order, and headers, line up exactly on the import; this is why you export first to get your starting point, because it all comes directly from SecureSheet.
- If you need other filters in the view to help narrow the export, make those columns visible (locked) in the view.
- If you happen to unhide the columns in the exported Excel file that are hidden, they are empty, but they are there for positioning the import, so do not delete them.
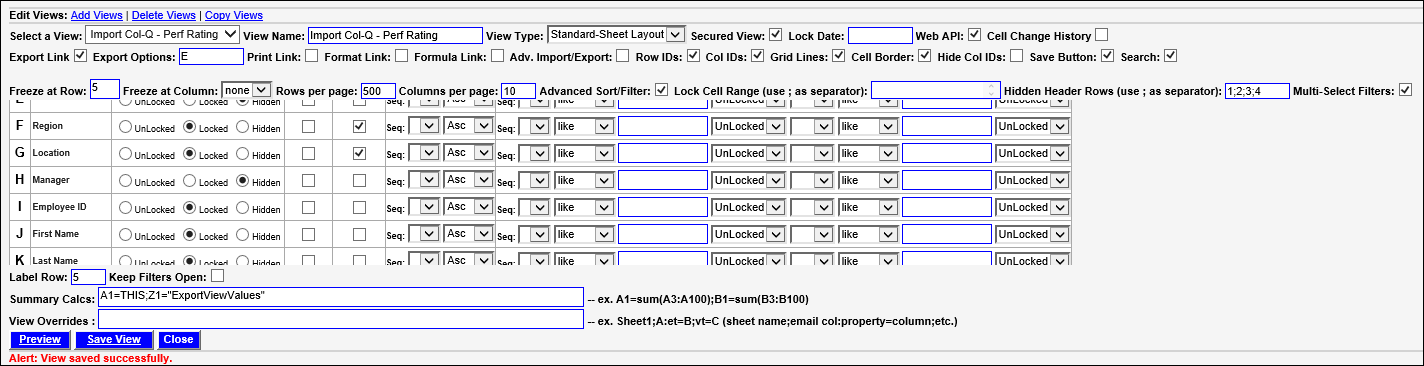
Your View Properties will look something like this:
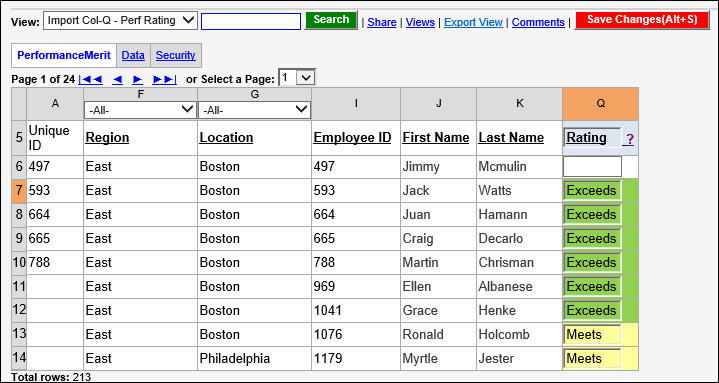
The View in this example looks like this: