Import and Export
Follow these instructions to use the Import/Export tool in SecureSheet to export and import updates to your values, formulas, and formats (e.g., changes to formulas, refreshing the data set).
Import and Export during Setup
During the initial setup of SecureSheet, after the structure of a SecureSheet has been loaded, it is important to use SecureSheet as the single source of truth for the latest and greatest version of your compensation sheet and your Users tab in your Users-Views SecureSheet.
- This means that any changes you need to make to the sheets offline always start with an export of the SecureSheet to work with the latest and greatest version.
- You update whatever you need to in Excel and then import your updates to SecureSheet.
Import and Export when a SecureSheet is Active
After go-live, when a SecureSheet is active - meaning end users are inputting data into SecureSheet - there are different ways to manage data changes in your live SecureSheet based on the scenarios that arise. There are additional tools available for data management in addition to the Import/Export tool.
- To update data values that may have changed or may have been missing at go-live (e.g., performance ratings for a group of employees greater than 1,000 rows), you may set up a view to import or paste values into, then use the Import Values by View tool.
- Scenarios may arise when the SecureSheet is live where a formula changes or a column order changes, and you must Lock the SecureSheet before you begin maintenance and use the Import/Export tool.
If you have questions about the best approach or tool to use to update your SecureSheet (while preserving your audit history and aiming for minimal maintenance time), contact the SecureSheet Support Team.
Video Resources:
Exporting a SecureSheet
NOTE: If your SecureSheet is live – meaning end users are entering data into it – refer to the Maintaining a Live SecureSheet instructions before you begin these steps.
- Login to SecureSheet.
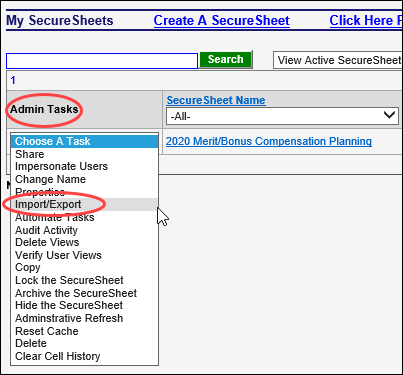
- Select Import/Export from the Admin Tasks drop-down list next to the SecureSheet you want to export on your SecureSheet home page.

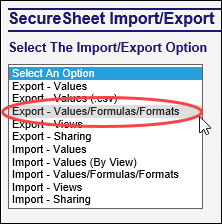
- Select Export – Values/Formulas/Formats.
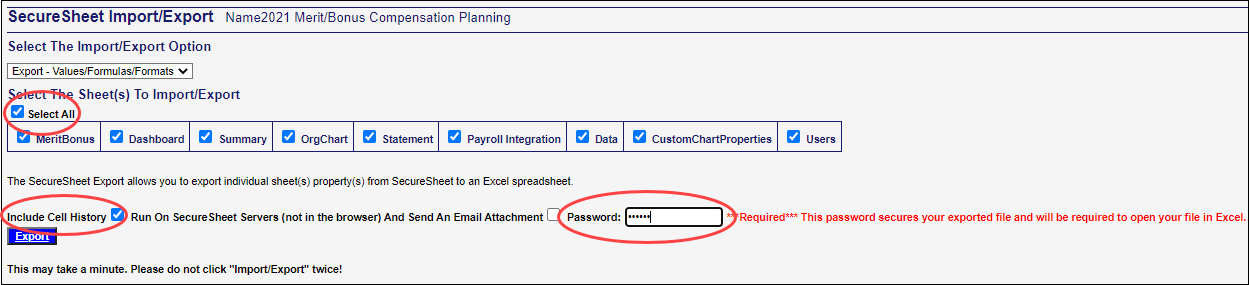
- Click the Select All checkbox to export all of the tabs in the workbook.
- Even if you are not planning to update all of the tabs in the workbook, export everything. You will ensure you have all the reference tabs that are used in VLOOKUPs or drop-down lists, for example.
- Click the Include Cell History checkbox to export a tab containing all cell history up to the point of the export.
- Secure your exported file by entering a password in the Password field. Remember the password you enter because it will be required to open your exported file in Excel.
NOTE: Your SecureSheet settings may not require a password on export, so you may see an Optional message. You may enter a password regardless as a best practice to protect your exported data.
- Click Export once.
NOTE: It may take a few minutes for your file to export. Do not click Export twice.
- When the export is complete, you will see the password pop-up in Excel where you can enter the password you entered before exporting from SecureSheet, and your file will open in Excel.
- Click Reset to return to the Import/Export Options.

- Click <<Go Back on the top right of your screen to return to your SecureSheet home page.

Importing to SecureSheet
NOTE: If your SecureSheet is live – meaning end users are entering data into it – refer to the scenarios in Maintaining an Active SecureSheet instructions before beginning these steps.
NOTE: Take the password off the Excel file that you want to import and save the file without the password before selecting it to import into SecureSheet.
- Login to SecureSheet.
- Select Import/Export from the Admin Tasks drop-down list next to the SecureSheet you want to import updates to on your SecureSheet home page.
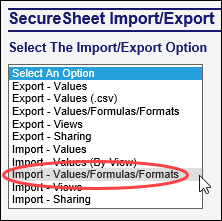
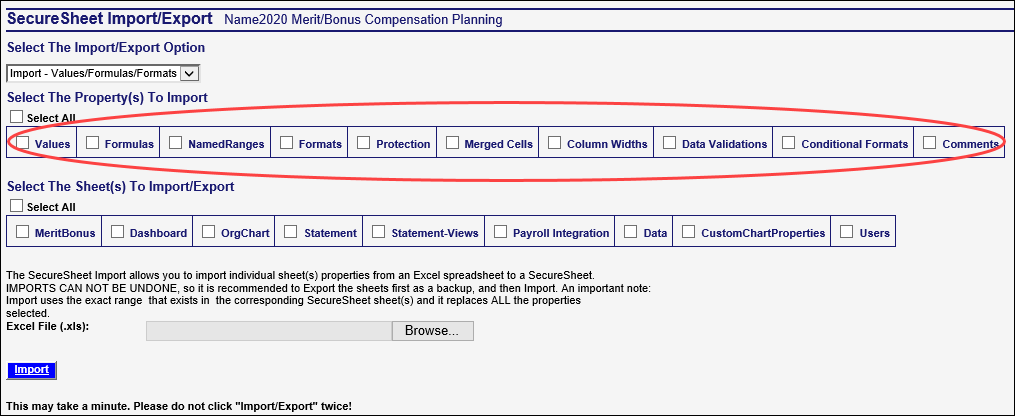
- Select Import – Values/Formulas/Formats.
- Check the Property(s) to Import from your source Excel file based on the updates you made. You do not need to import properties that have not changed. If you are importing Formulas, also import Values. If you need to import values only, consider using the Import Values by View tool (e.g., if you have 1,000 or more rows to update).
- Values – Check if you updated value-based columns.
- For example, you updated values on a supporting sheet used for VLOOKUPs or drop-down lists, or you updated value-based columns on your main sheet.
- If you only check import values, you will not wipe out formulas.
- If, for example, you have 15,000 rows in your SecureSheet and you need to update all 15,000 rows, import with the Values property checked.
- Formulas – Check if you updated any formulas.
- Formulas are never touched on Import unless you check the Formulas checkbox.
CAUTION: Formulas come from the Excel file; if there are no formulas in the Excel file that you import AND you check the Formulas checkbox on the properties to import, you will overwrite the cells with blanks.
- When you import Formulas, this controls the rows that will be replaced in the existing SecureSheet. The import will have the exact number of rows in your source Excel file with Formulas checked. For example, if you exported a sheet with 1,000 rows, made changes and import a new sheet with only 300 rows, your SecureSheet will only have those 300 rows; you will lose 700 rows.
- Formulas come from the Excel file; if there are no formulas in the Excel file that you import and you click the Formulas checkbox on the properties to import, you will overwrite the formula-based cells with blanks.
- Importing formulas will cause a full recalc of your SecureSheet. This happens after you login to the sheet the first time after import and save a change. As a best practice, you may want to force this recalc (i.e., make it yourself) so your end users are not slowed down by it. After your import is complete, go to the Administration view, enter an "x" in a blank cell, click Save Changes, remove the "x", and click Save Changes again.
- NamedRanges – Rarely are Named Ranges used in SecureSheet. Check if you updated any Named Ranges used for drop-down lists or VLOOKUPs.
- Named Ranges are difficult to manage and maintain when troubleshooting across multiple tabs in a workbook, for example, trying to identify where they are used. If used for anything other than drop-down lists or VLOOKUPS to static data, transition to discrete cell references (e.g., $A$2:$C$500) because these can be easily traced.
- Formats – Check if you updated any formatting properties (e.g., font, color, alignment, text wrap).
- Protection – Check if you updated any protection settings.
- Merged Cells – Check if you updated any merged cells (merge or unmerged).
- Column Widths – Check if you adjusted any column widths.
- Data Validations – Check if you updated any data validations.
- Conditional Formats – Check if you updated any conditional formatting.
- Comments – Check if you updated any comments that exist in the worksheet.
- Comments will appear in their respective cell as a question mark and open in another browser window when the user clicks the question mark.
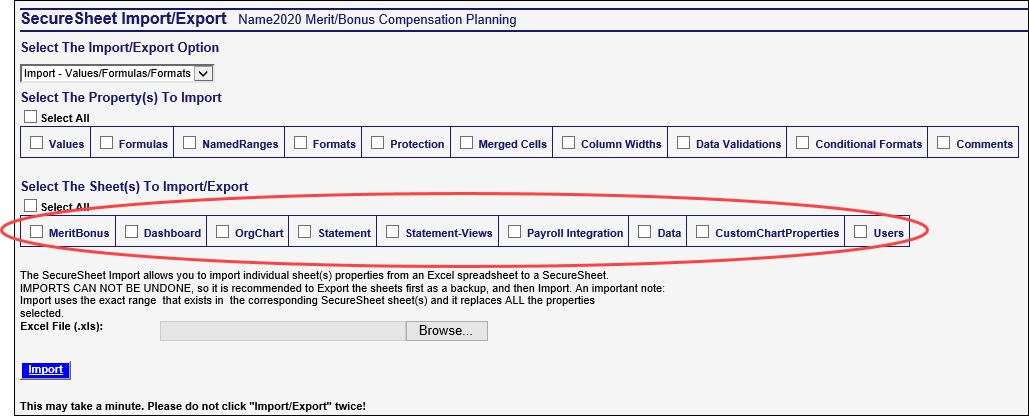
- Select only the tabs in the workbook that you updated; those will be the only tabs updated through the import.
NOTE: If you did not update every tab, there is no reason to import every tab.
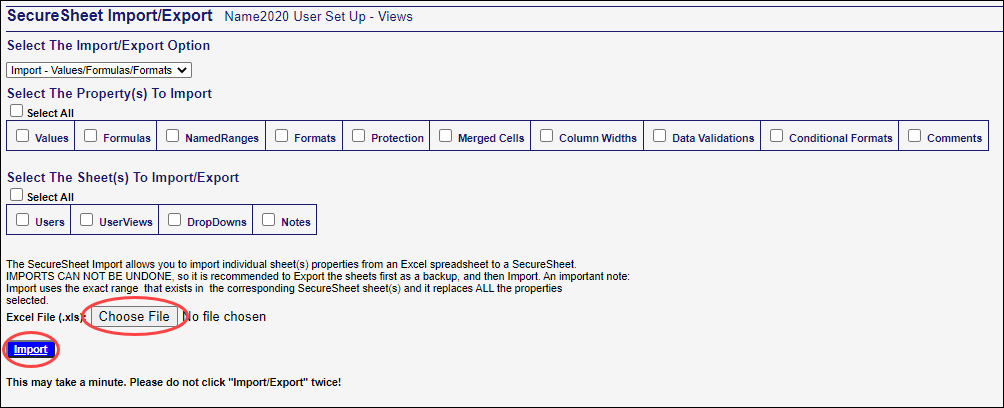
- Click Browse and locate your Excel file for import.
NOTE: It is very important that the name of the tab(s) in Excel exactly matches the name of the tab(s) in SecureSheet. The import will fail if the Excel is different than SecureSheet.
NOTE: If you have a password on your Excel file, remove it before importing to SecureSheet or you will receive an import error.
- Click Import once.
NOTE: It may take a few minutes for your file to import. Do not click Import twice.
You will return to your imported sheet in SecureSheet when the import has finished.
- Click the Recalc link.
NOTE: This link should be in row 1 all the way over to the right in your SecureSheet. If you do not see a Recalc link, you may add it to a spare cell using this syntax: vexit/recalc/Recalc
NOTE: When you import an update to one tab and not your entire spreadsheet, SecureSheet needs to recalculate to accommodate the updates you made in your import. Clicking this link is like making the first save to your SecureSheet, and, depending on the complexity of your model, it may take a moment for that first save. As an administrator, you want that first save to be done by you and not by your end users. If you have any questions about data imports, contact the SecureSheet Support Team.
Import/Export General Notes
- As a SecureSheet administrator for your organization, Export – Values/Formulas/Formats or Import – Values/Formula/Formats are the options you work with most often in the Import/Export tool.
- Do not use Import Values unless you are importing supporting tabs with static values used in VLOOKUPs or for drop-down lists.
- Do not attempt to use the import Views or import Sharing options without direction from the SecureSheet Support Team.
- Export Views exports the View design in column format. You may select this option if you want to reference an export of the View design. Follow the prompts that appear when you select this export option. In the Year 2 and Beyond process, you will export views to have an offline record of the view setup for the previous cycle.
- Export Sharing exports the Sharing set-up by user in column format. This is a helpful export to reference the Sharing profile of each user. Follow the prompts that appear when you select this export option. In the Year 2 and Beyond process, you export sharing to have an offline record of the sharing setup at the end of the previous cycle.
- Sharing permissions in the exported sharing report are:
Y = Update
N = View Only
A = SecureSheet Administrator
R = Update/Import View Values