Insert or Delete Columns
A scenario may arise during setup where you need to insert a column(s) or delete a column(s) in a SecureSheet after the view design and user security is already in process or initially setup, or when a SecureSheet is live.
Key Points:
- Matching the column structure (i.e., the number of columns) online first preserves the column settings and security setup in each view.
- If you need to insert a column(s) or delete a column(s), adjusting online first is important so that the existing column settings and security setup shifts with the insert or deletion.
- Then, after importing your updates from Excel, the only column settings that have to be adjusted in the views are for any newly inserted columns.
If the scenario requires you to insert a column between two data columns (versus at the end of the data set), you may do so using the Administration tools.
- The same number of columns have to exist in SecureSheet as exist in the Excel file you are importing from.
- If you re-purpose a column or adjust the order of the columns, and it does not require an additional column, you may update the column order in excel and import with no impact to the structure of the SecureSheet.
The last three columns in each tab in your SecureSheet are the row audit columns. These are system-generated columns that audit row changes. They will always be at the end of the data set after the last column in a tab. You can insert more columns to have on reserve if your last column is right next to the audit columns.
- When the SecureSheet was first created, there were extra 25 columns added to the right of the last data column (on the main planning tab).
- If the scenario allows for the extra column to be at the end of the data set, use one of those extra columns.
- If the data is already at or will run over the last spare column, insert column(s) before importing.
- Check all tabs that you are updating because it is important not to overwrite the last three system-generated audit columns on each tab.
- After inserting or deleting column(s), export from SecureSheet. Then when you import, the contents you add in Excel will overlay the existing SecureSheet.
During the setup phase of Year 2 and Beyond, since the views and security are already setup in SecureSheet, make any column adjustments to the model online first to match any changes to the model before you import an updated excel file.
- If you are in the setup phase of Year 2 and Beyond, before inserting and deleting columns, reset rows so that the structural changes can be made faster across just a few rows of data versus your entire data set (which you will refresh before opening up your next planning cycle).
Video Resources:
Inserting a Column into a SecureSheet
- Login to SecureSheet.
- (If you are working with an Active SecureSheet) Lock the SecureSheet for maintenance. This informs other administrators that someone is doing significant sheet maintenance.
- Export Values/Formulas/Formats to have an offline reference of the latest working copy of the current SecureSheet.
- In SecureSheet, go to the tab where you want to insert a column(s).
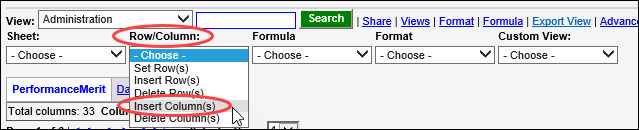
- Select Administration from the View: drop-down.
- Select Insert Column(s) from the Row/Column drop-down.
- Set up the column insertion:
A. Enter the number of columns you want to insert
B. Select the box above the column you want to insert before.
C. Click Go.
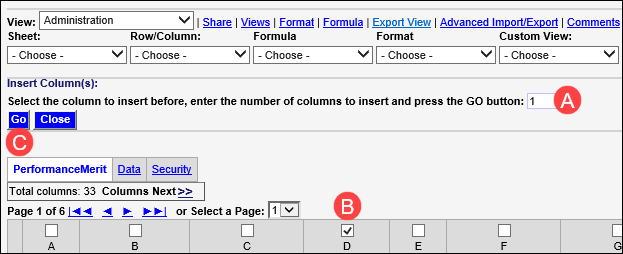
- Click Close.
- Export Values/Formulas/Formats to have an offline copy of SecureSheet with your newly inserted columns.
- In the exported Excel file, make the required changes, and save the file under a new name (the exported file you began the process with should be your back-up).
- In SecureSheet, Import Values/Formulas/Formats and select All Properties and All Sheets. This import will overlay the SecureSheet with the new content of your Excel file.
- Verify your changes after import. Check your views to make sure the newly inserted column is set to Locked, UnLocked, or Hidden as required in each view.
- Protect the header cells for the newly inserted columns (you will see the beveled edge around them if they are not protected).
- Take the SecureSheet off Maintenance Lock.
Deleting Column(s) in a SecureSheet
- Login to SecureSheet.
- (If you are working with an Active SecureSheet) Lock the SecureSheet for maintenance. This informs other administrators that someone is doing significant sheet maintenance.
- In SecureSheet, go to the tab where you want to delete a column(s).
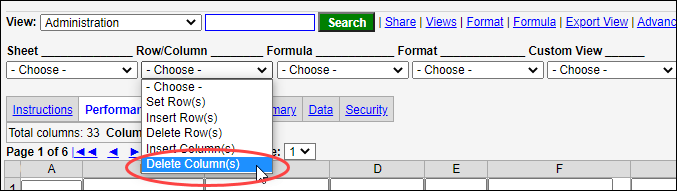
- Select Administration from the View: drop-down.
- Select Delete Column(s) from the Row/Column drop-down.
- Select the column(s) you want to delete.
- Click Go.

- Click Close.
- Take the SecureSheet off Maintenance Lock.